API Tokens
All API requests require authentication using API tokens.
API tokens in Libromi Connect allow you to integrate your account with external services and applications by providing secure, authenticated access. These personal access tokens function like a combination of a username and password for API calls.
Important: The tokens generated in Libromi Connect do not expire and will remain active until you manually revoke them.
How to Generate an API Authentication Token
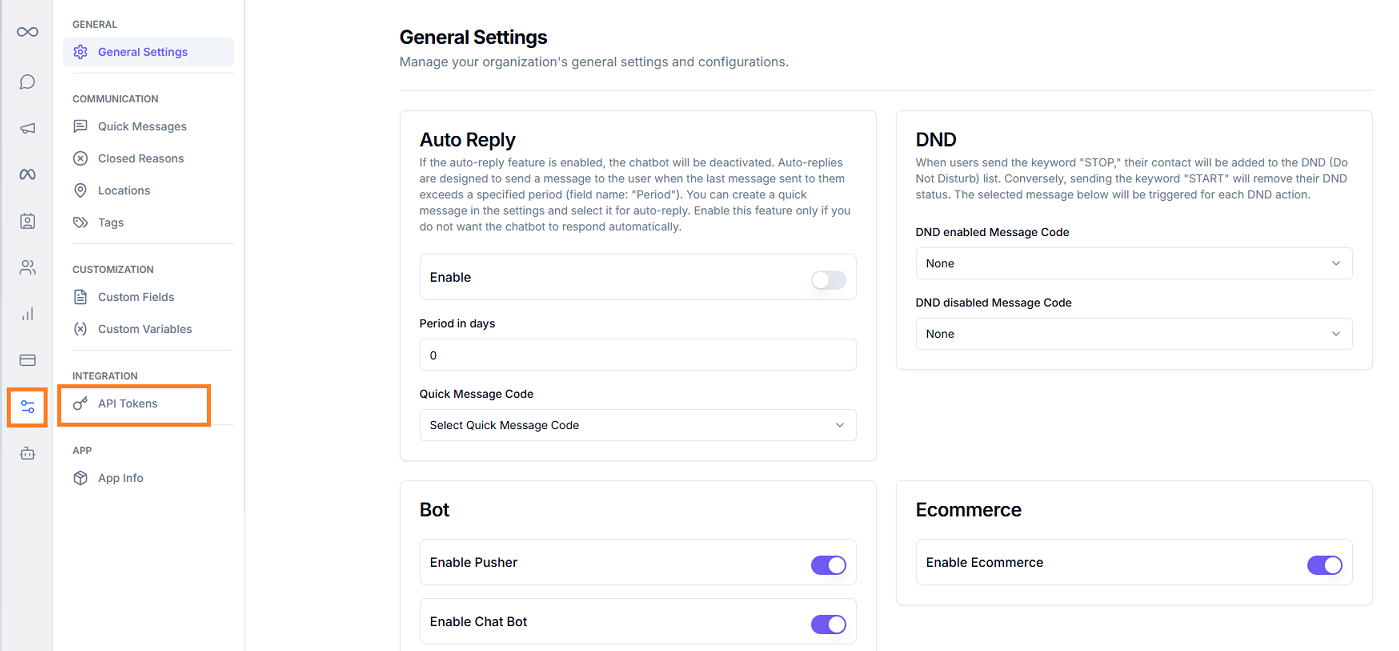
Step 1: Navigate to the API Tokens Page
- From the main dashboard, click on the Settings icon in the bottom-left navigation menu.
- In the Settings menu, under the Developer section, select API Tokens.
Step 2: Generate a New Token
- On the API Tokens page, click the + Generate Token button located in the top-right corner.
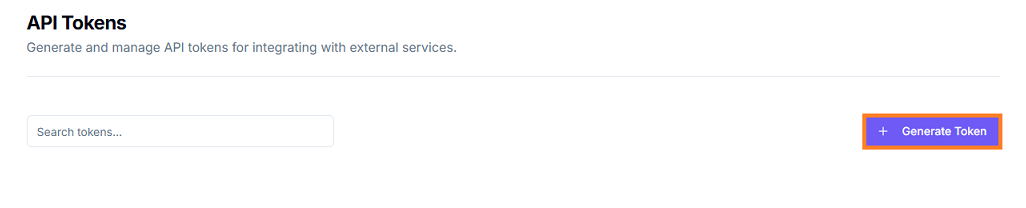
- A Generate New API Token pop-up window will appear.
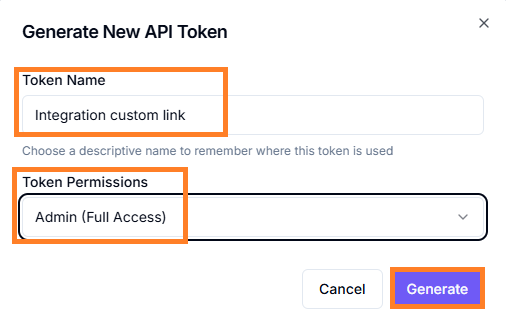
Step 3: Configure Your Token
-
Token Name:
Enter a descriptive name for your token. This will help you identify the token's purpose later (e.g., "Zapier Integration," "Custom CRM Link"). -
Token Permissions:
Click the dropdown menu to select the access level for this token:- Read Only: Grants permission to fetch data from your Libromi Connect account but not to modify it.
- Admin (Full Access): Grants full permission to read, create, update, and delete data through the API.
-
Click the Generate button to create the token.
Step 4: Save Your Token Securely
After generation, a pop-up window will display your new API token.
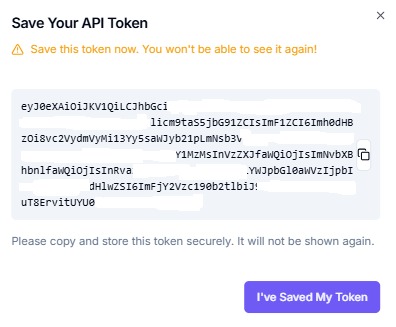
Important: For security reasons, the full token is only shown once. You must copy and store it in a secure location immediately. You will not be able to retrieve the full token again after closing this window.
- Click the Copy icon to copy the token to your clipboard.
- Once you have saved your token, click the I've Saved My Token button.
You will now see your new token listed on the API Tokens page, where you can manage or revoke it at any time by clicking the delete icon.
Using API Tokens
Include your API token in the request headers:
Authorization: Bearer YOUR_API_TOKEN
Content-Type: application/json
Authentication Examples
cURL Example
curl -X POST
'https://wa-api.cloud/api/v1/messages'
-H 'Authorization: Bearer YOUR_ACCESS_TOKEN'
-H 'Content-Type: application/json'
-d '{
"to": "RECIPIENT_PHONE_NUMBER",
"type": "template",
"template": {
"name": "lead_reg",
"language": {
"code": "en",
"policy": "deterministic"
},
"components": [
{
"type": "body",
"parameters": [
{
"type": "text",
"text": "YOUR_PARAMETER_1"
},
{
"type": "text",
"text": "YOUR_PARAMETER_2"
},
{
"type": "text",
"text": "YOUR_PARAMETER_3"
},
{
"type": "text",
"text": "YOUR_PARAMETER_4"
}
]
}
]
}
}'
Security Best Practices
- Keep your API tokens secure and never expose them in client-side code.
- Store tokens in a secure location immediately after generation (they are only shown once).
- Use environment variables to store API tokens.
- Monitor API token usage in your dashboard.
- Revoke tokens that are no longer needed from the API Tokens page.
- Use Read Only permissions when full access is not required.
- Implement proper error handling for authentication failures.
Rate Limits
The API has the following rate limits:
| Account Type | Requests per Hour | Burst Limit (per Minute) |
|---|---|---|
| Free | 1,000 | 100 |
| Paid | 10,000 | 100 |